Purpose of the tutorial
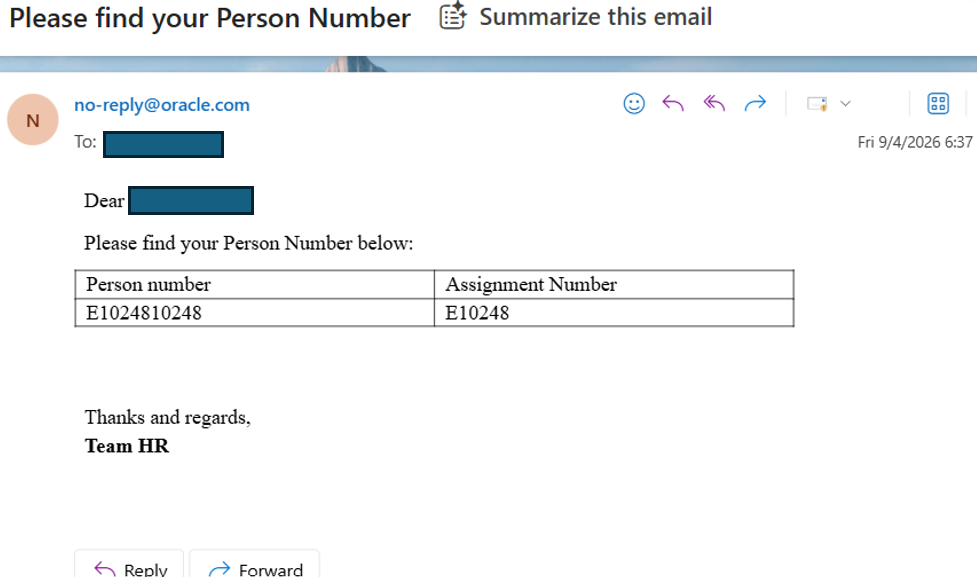
This document explains how to send an email notification using Bursting in Oracle Fusion HCM.
To achieve this, we need to create the following components:
- Data Model
- BI Publisher Report
- Bursting Query
- Schedule the Report
Problem Statement
Suppose we have a requirement to send an email notification to a specific employee based on their Person Number.
For example, if we need to send an email notification to the employee whose Person Number is 10248, we can use Bursting to deliver the notification through email. To implement this requirement, we first need to create a Data Model and a Report. The Data Model will fetch the required employee information, while the
Email Bursting Configuration
Email Bursting Configuration
Email Bursting Configuration First, create a Data Model. For detailed information about creating a Data Model, refer to the previous blog/document that explains how to create a SQL query and Data Model.
For this requirement, we are making a small change to the SQL query by hardcoding the Person Number of the employee to whom we want to send the notification.
For this example, we have hardcoded Person Number 10248.
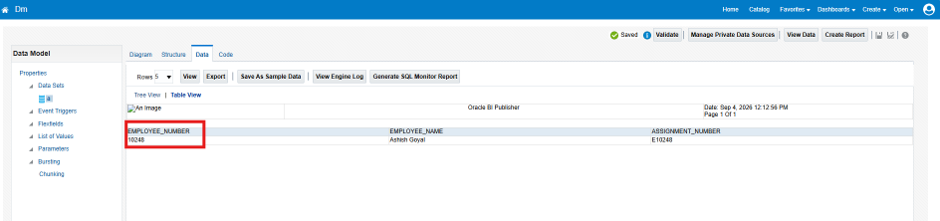
Reference SQL Query
SELECT papf.person_number AS employee_number
ppnf.display_name AS employee_name,
paam.assignment_number AS assignment_number
FROM per_all_assignments_m paam,
per_person_names_f ppnf,
per_all_people_f papf
WHERE 1 = 1
AND TRUNC(SYSDATE) BETWEEN paam.effective_start_date AND paam.effective_end_date
AND paam.assignment_type = ‘E’
AND paam.effective_latest_change = ‘Y’
AND paam.assignment_status_type IN (‘ACTIVE’, ‘INACTIVE’)
AND paam.primary_flag = ‘Y’
AND TRUNC(SYSDATE) BETWEEN papf.effective_start_date AND papf.effective_end_date
AND paam.person_id = papf.person_id
AND TRUNC(SYSDATE) BETWEEN ppnf.effective_start_date AND ppnf.effective_end_date
AND ppnf.name_type = ‘GLOBAL’
AND paam.person_id = ppnf.person_id
and papf.person_number=’10248′
Add the Bursting Query
Once the Data Model is created, we need to configure the Bursting Query.
The Bursting Query determines:
- Which report template should be used
- What format the report should be generated in
- Which delivery channel should be used
- To whom the email should be sent
- What the email subject should be
- What content should be included in the email body
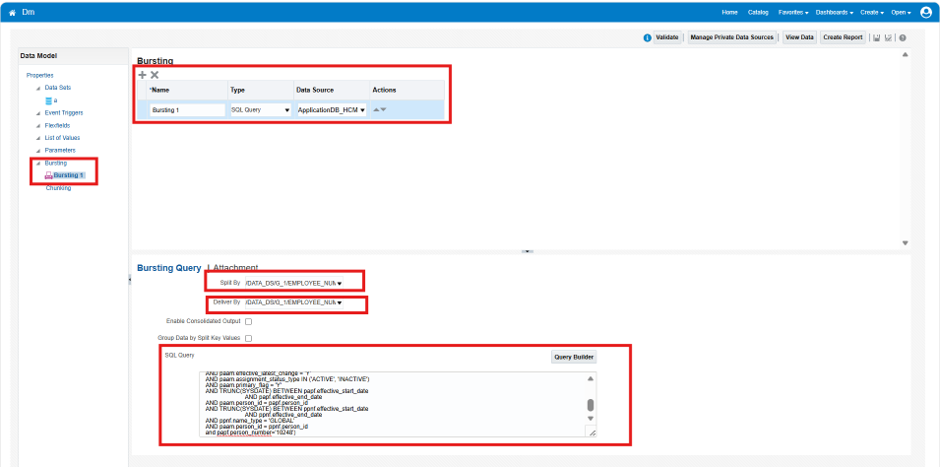
Steps Go to the Data Model → Edit → Bursting.
- Open the appropriate Data Model and click Edit.
- Select the Bursting option.
- Under the Bursting section, click the + icon to add a new row.
- Enter a name for the bursting definition.
- Select SQL Query under the Type column.
- Select Analytics under the Data Source column.
- Under the Bursting Query / Attachment section, configure the required bursting options.
- Use the Split By option to determine how the data should be split.
- Use the Deliver By option to determine the recipient for each split.
- Do not select Enable Consolidated Output or Group Data by Split Key Values for this requirement.
- Enter the required SQL query in the SQL Query section.
Bursting Query Parameters (Reference)
| Parameter | Description |
| KEY | The key used to identify each data set or burst. |
| TEMPLATE | The name of the report template that will be used for bursting. |
| LOCAL | Defines the language and locale used to generate the report. |
| OUTPUT_FORMAT | Defines the format of the generated report, such as PDF or HTML. |
| DEL_CHANNEL | Defines the delivery channel. For email notification, use EMAIL. |
| OUTPUT_NAME | Defines the name of the generated output file. |
| PARAMETER1 | Used for the email recipient (TO address). |
| PARAMETER2 | Used for the CC email address. |
| PARAMETER3 | Used for the From email address. |
| PARAMETER4 | Defines the email subject. |
| PARAMETER5 | Defines the email body. |
| PARAMETER6 | Determines whether the report output is attached to the email. |
Reference Bursting Query
The following query is used for our example:
select distinct employee_number as “KEY”,
‘Notification’ TEMPLATE,
‘en_US’ LOCALE,
‘HTML’ OUTPUT_FORMAT,
‘EMAIL’ DEL_CHANNEL,
‘testxy@gmail.com‘ PARAMETER1,
NULL PARAMETER2,
‘no-reply@oracle.com‘ PARAMETER3,
‘Please find your Person Number’ PARAMETER4,
” PARAMETER5,
‘false’ PARAMETER6
from (SELECT papf.person_number AS employee_number,
ppnf.display_name AS employee_name,
paam.assignment_number AS assignment_number
FROM per_all_assignments_m paam,
per_person_names_f ppnf,
per_all_people_f papf
WHERE 1 = 1
AND TRUNC(SYSDATE) BETWEEN paam.effective_start_date AND paam.effective_end_date
AND paam.assignment_type = ‘E’
AND paam.effective_latest_change = ‘Y’
AND paam.assignment_status_type IN (‘ACTIVE’, ‘INACTIVE’)
AND paam.primary_flag = ‘Y’
AND TRUNC(SYSDATE) BETWEEN papf.effective_start_date AND papf.effective_end_date
AND paam.person_id = papf.person_id
AND TRUNC(SYSDATE) BETWEEN ppnf.effective_start_date AND ppnf.effective_end_date
AND ppnf.name_type = ‘GLOBAL’
AND paam.person_id = ppnf.person_id
and papf.person_number=’10248′)
Important
In the above example:
AND papf.person_number = ‘10248’ is used to retrieve the specific employee for whom the notification needs to be generated.For a real business scenario, instead of hardcoding the Person Number, this value can be dynamically derived based on the business requirement.
Understanding Split By and Deliver By
There are two important concepts in BI Publisher Bursting:
Split By
Split By determines how the report data should be divided into separate outputs.
For example, if the report contains data for multiple employees, we can split the report based on Person Number.
In our example, the data is split based on the employee/person number.
Deliver By
Deliver By determines to whom each split report should be delivered.
In our example, the notification needs to be sent to the respective employee. Therefore, the delivery is based on the employee/person number.
In simple terms:
Split By → How should the data be divided?
Deliver By → To whom should each output be delivered?
Once the Bursting Query has been configured:
- Click Save.
- Save the Data Model.
- Provide an appropriate name for the Data Model.
- Verify that the Data Model is successfully saved.
The Data Model configuration is now complete.
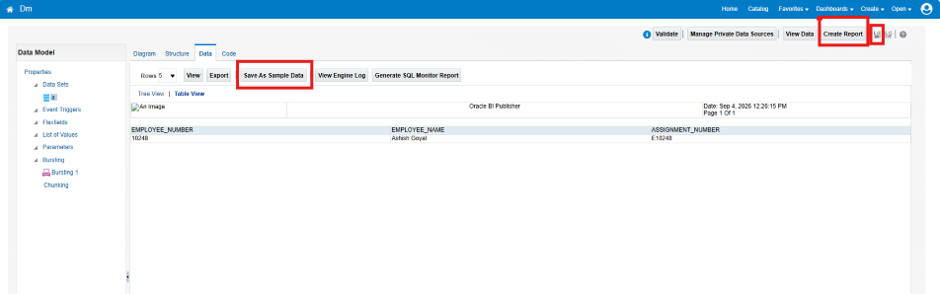
Create the BI Publisher Report
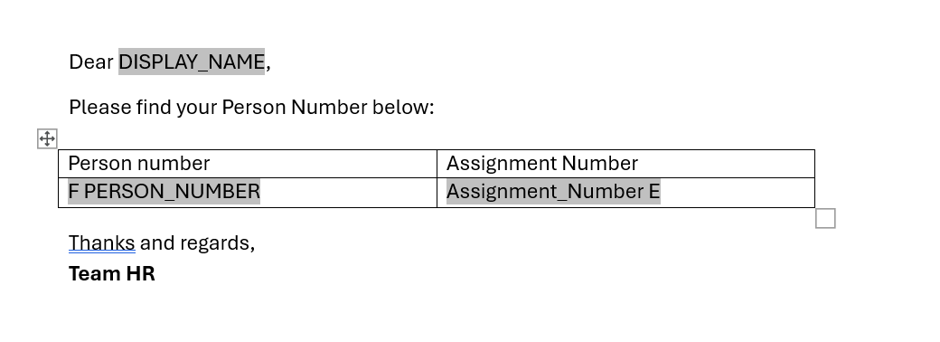
After completing the Data Model, create a BI Publisher Report using the Data Model created in the previous step. For the report template, use the template discussed in the previous blog/document.
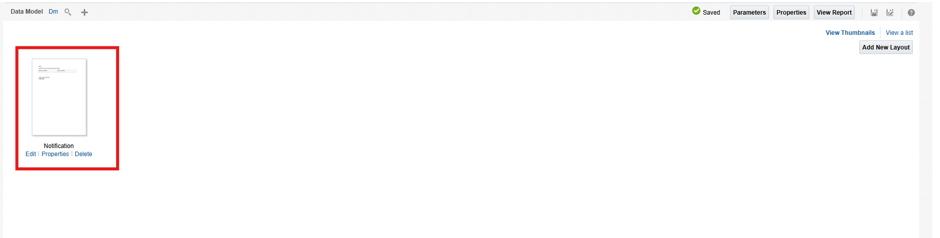
Template
Add the required template to the report.
Enable Bursting at the Report Level
After creating the report, we need to enable Bursting at the report level.Follow these steps:
- Open the report.
- Go to Properties.
- Locate the Bursting option.
- Enable Bursting.
- Save the report.
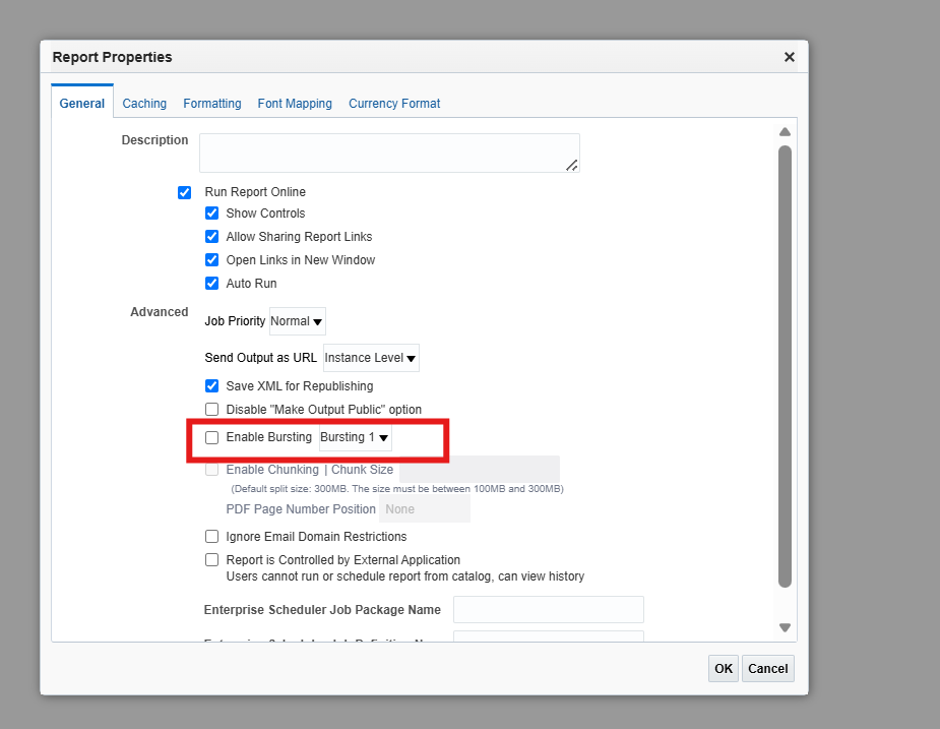
Once Bursting is enabled, the report is ready to generate the output according to the Bursting Query configuration.
Schedule the Report
The final step is to schedule the report so that the email notification can be generated and delivered. To schedule the report:
- Open View Report.
- Click the Settings icon.
- Select the Schedule option.
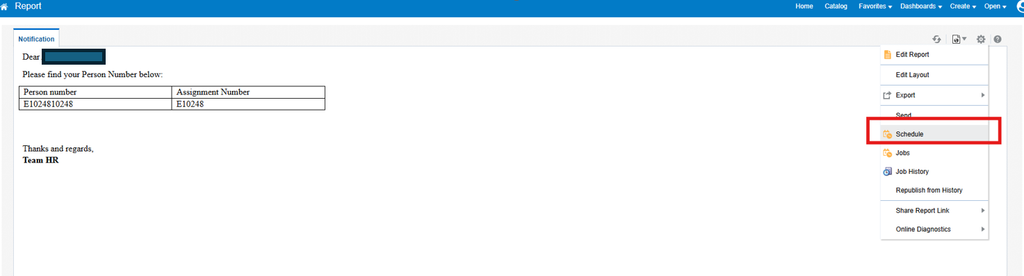
Submit the Scheduled Report
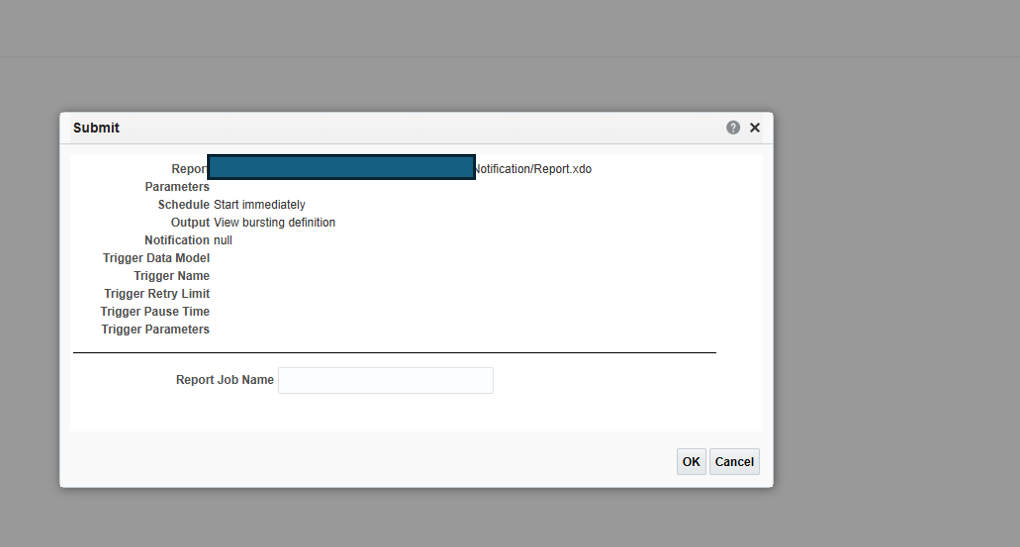
After selecting the Schedule option, the scheduling page will open. Click the Submit button on the right-hand side.

A pop-up window will appear asking for the Report Name. Enter an appropriate name for the scheduled report.
For example: Employee Person Number Notification
Then submit the scheduled process.
Check Job History
After submitting the scheduled report, we can verify its execution status through Job History. Follow these steps:
- Go to View Report.
- Click the Settings icon.
- Select Job History.
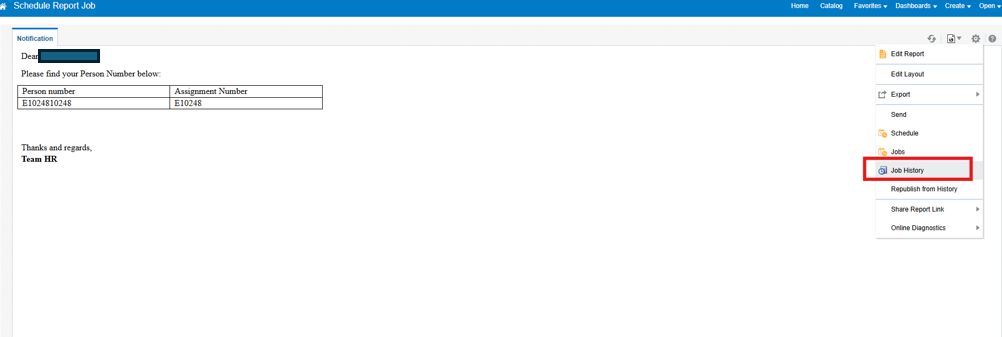
The Job History page displays the execution status of the scheduled report.
Verify the Status
In the Job History, verify the status of the scheduled report. If the status is Success, it indicates that the report was successfully processed by BI Publisher.
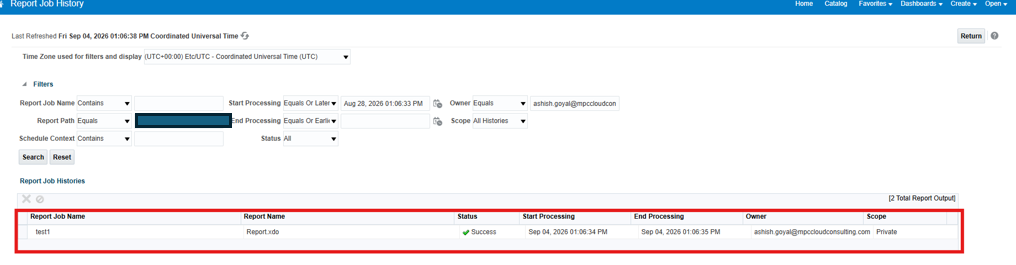
The email notification can then be verified in the recipient’s mailbox.